Pxe network installation operating system
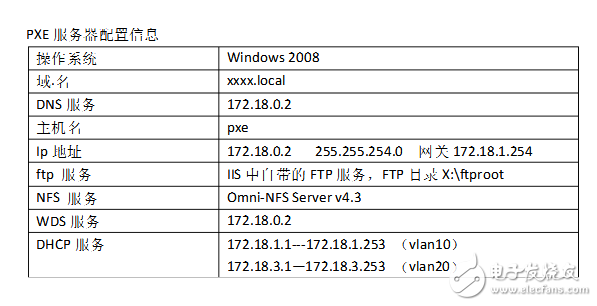
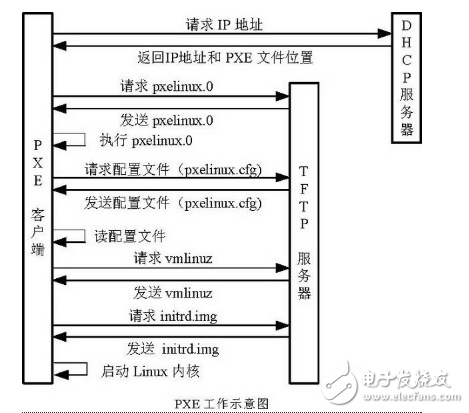
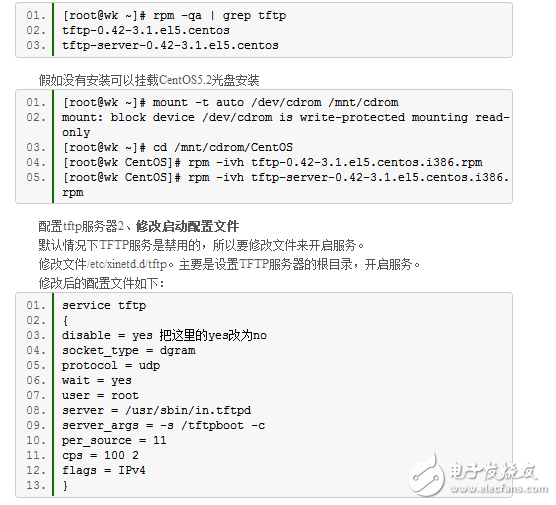
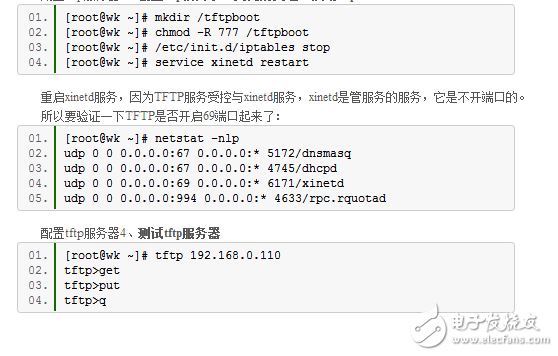
PXE technology is simply to use the PXE BootROM (self-starting chip) on the network card to intercept the system boot control, and download the required image file through the TFTP service specified by DHCP. BootROM is currently the default hardware firmware for universal network cards. This technology is mainly used in environments such as installation and deployment of remote systems. Strictly speaking, PXE is not an installation method, but a guiding method. The necessary condition for PXE installation is to include a PXE-supported network card (NIC) in the computer to be installed, that is, the PXE Client must be included in the network card. The PXE protocol allows a computer to boot over the network. This protocol is divided into Client and Server, while PXE Client is in the ROM of the NIC. When the computer boots, the BIOS transfers the PXE Client to memory for execution, and then the PXE Client downloads the remotely placed files to the local network for operation. Running the PXE protocol requires setting up a DHCP server and a TFTP server. The DHCP server assigns an IP address to the PXE Client (the host that will install the system). Since the PXE Client is assigned an IP address, the corresponding PXE settings need to be added when configuring the DHCP server. In addition, the TFTP Client already exists in the ROM of the PXE Client, so it can download the required files through the TFTP protocol to the TFTP Server. 1. The PXE Client starts from its own PXE NIC and requests IP from the DHCP server in the network. 2. The DHCP server returns the IP assigned to the client and the placement of the PXE file (this file is usually placed on a TFTP server); 3. The PXE Client requests the pxelinux.0 file from the TFTP server in the network. 4. The PXE Client executes the file after obtaining the pxelinux.0 file. 5. According to the execution result of pxelinux.0, load the kernel and file system through the TFTP server; 6. Enter the installation screen. You can install it by selecting one of HTTP, FTP, and NFS. For detailed workflow, please refer to the following picture: In practice, we often encounter situations like this: if you want to install Linux but the computer does not have an optical drive or floppy drive, or a non-standard floppy drive and optical drive with a notebook configuration, such as 1394 interface, USB interface, etc., when installing Linux. Booted Linux kernels generally do not have drivers for these interfaces, so Linux cannot be installed locally. In addition, in some occasions, such as computer rooms, IT labs, and factory production lines, there are a large number of computers that need to install Linux at the same time. The way to install one by one is not only inefficient, but also not conducive to maintenance. This is the time you need the power of PXE. General process: First, bios starts, selects the startup (installation) mode of the operating system (at this time, the memory is blank), and then looks for the boot program of the operating system according to the relevant installation mode (different modes, corresponding to different bootloaders) Of course, it also corresponds to the location of different boot programs. The bootloader loads the file system initialization (initrd) program and the kernel initial image (vmlinuz) to complete the initialization before the operating system installation. Then, the operating system starts to install related systems and applications. program. Hard disk installation process: bios startup - MBR looking for grub - grub program reads menu.list and other configuration files, find the kernel boot image and related initialization programs, install (or start). PXE (Pre-boot ExecuTIon Environment) is a protocol designed by Intel to enable computers to boot over the network. The protocol is divided into two ends of the client and the server. The PXE client is in the ROM of the network card. When the computer starts, the BIOS transfers the PXE client into the memory and displays the command menu. After the user selects, the PXE client will be placed at the remote end. The operating system is downloaded to the local network for download. The process of pxe network installation: bios startup - the program in pxe client enters the memory and displays the command menu - this program starts to look for the network boot program (bootstrap file, the name of this file varies with the release version, in centos , it is pxelinux.0) - the boot program reads the configuration file pxelinux.cfg, obtains the relevant file information of the system initialization - the system starts and starts to install. The client boots from its own PXE NIC, requests IP from the DHCP server in the network, and searches for the location of the boot file. The DHCP server returns the location where the client IP and bootstrap files are placed (this file is usually placed on a TFTP server) The client requests the bootstrap file from the TFTP server in the network. The client executes the file after obtaining the bootstrap file. Load the kernel and file system through the TFTP server according to the execution result of bootstrap The summary is: 1) NIC client NIC rom Find dhcp server, get the ip and boot program location by /etc/dhcp.conf 2) There is dhcp.conf (bootstrap file name) and tftp configuration (tftp and path, there are boot program and system initialization program), get the absolute path of the boot program pxelinux boot file, run the boot program, read the boot configuration file Pxelinux.cfg/default, get two related files initialized by the operating system 3) Choose the installation method The client broadcasts the dhcp request - the server responds to the request, establishes the link - the dhcp and tftp configuration gets the ip and the boot program location - the client downloads the bootloader and starts running - the bootloader reads Enter the installation screen. You can install it by selecting one of FTP, HTTP, and NFS. Dhcp configuration file /etc/dhcpd/dhcp.conf - ip management and bootloader name Tftp configuration file /etc/xinetd.d/tftp - tftp root directory, and the above bootloader name constitutes the full path The configuration file read by the bootloader /tftpboot/pxelinux.cfg/default - boot the kernel other Software and hardware configuration: NIC should support pxe boot, the operating system also supports pxe boot, and another ftp server is used to store the operating system installation files, dhcp server is used to allocate ip 1) Configure the dhcp server Since the PXE client is usually a bare metal with no system installed, in order to contact the server and correctly download the relevant boot files, the DHCP service needs to be pre-configured to automatically assign an address and inform the location of the boot file. [root@localhost /]#yum -y install dhcp [root@localhost /]#vim /etc/dhcp/dhcp.conf Ddns-update-style none; default-lease-TIme 21600; max-lease-TIme 43200; opTIon domain-name "benet.com"; Option domain-name-servers 8.8.8.8; Subnet 192.168.122.0 netmask 255.255.255.0 { Option routers 192.168.122.1; Option subnet-mask 255.255.255.0; Range 192.168.122.100 192.168.122.200; Next-server 192.168.122.1; #Specify the address of the TFTP server Filename "pxelinux.0"; #Specify the file name of the PXE bootloader } [root@localhost /]#service dhcpd start Note: filename is an important option. Its role is to indicate the location of the bootstrap, usually pointing to a directory on a TFTP server. Here is the relative path, where the top half of the path is in a configuration file. 2) Configure the tftp server The configuration file of the TFTP service is /etc/xinetd.d/tftp. The RedHat9 default installation has already generated this file. However, Centos does not install this software. You need to install tftpserver, this configuration file will be generated automatically. Service tftp { Disable = no #where yes needs to be changed to no Socket_type = dgram Protocol = udp Wait = yes User = root Server = /usr/sbin/in.tftpd Server_args = -s /tftpboot Per_source = 11 Cps = 100 2 Flags = IPv4 } Note: This file basically does not need to be changed, but what needs to be noted is the server_args= -s /tftpboot line, which means that /tftpboot is the root directory, so the filename in dhcpd.conf should write bootstrap. Relative path: filename "pxelinux.0", which is for security reasons. If you remove the -s parameter, then you must indicate the absolute path to bootstrap in the filename line: filename "/tftpboot/pxelinux.0". Note that the content of -s here will vary depending on the content of the distribution, and generally does not need to be changed. In the network protocol, the TFTP protocol should be well understood. So today we focus on the content of configuring the tftp server. TFTP (Trivial File Transfer Protocol) is a protocol used in the TCP/IP protocol suite for simple file transfer between a client and a server, providing a file transfer service that is not complicated and has little overhead. TFTP is carried on UDP, provides unreliable data stream transmission services, does not provide access authorization and authentication mechanisms, and uses timeout retransmission to ensure data arrival. Compared with FTP, TFTP is much smaller. TFTP is the simplest network protocol for downloading remote files. It is implemented based on the UDP protocol. It uses port 69 of UDP. Configure the tftp server 1. Check whether the system installs the tftp service. Specify /tftpboot as the root directory of the tftp server. The parameter -s specifies chroot, and -c specifies that files can be created. Configure tftp server 3, create tftp root directory, close the firewall, start tftp-server Bootstrap For operating systems that support network installation, Bootstrap can basically be found from the installation source file. For this example, the bootstrap of centos is cdrom:/isolinux/pxelinux.0 and we copy them all to tftpboot. Edit boot configuration file Initr.img and vmlinux in the images/pxeboot directory on the first installation CD of centos are also tested in the tftpboot/ directory. Create a pxelinux.cfg directory in /tftpboot for the isolinux configuration file. There is an isolinux.cfg file on the CD isolinux/, copy it to the /tftpboot/pxelinux.cfg/ directory and rename it to default. The following is the modified default file: Default linux Prompt 1 Timeout 30 Label linux Kernel vmlinuz Append ks=ftp://192.168.122.1/centos6.3/ksftpsimple.cfg,initrd=initrd.img This Default file is easy to understand. It tells the kernel to boot after booting, and the configuration file used is somewhere. 1) Make sure that several services that have just been configured on the server are turned on; turn off the firewall; choose to boot from the network in bios 2) The remaining steps are the same as installing from the hard disk M.2 NVME SSD Enclosure NGFF SSD Enclosure Ssd Enclosure,M.2 Ssd Enclosure,Type C M.2 Ssd Enclosure,M.2 Nvme Ssd Enclosure Shenzhen GuanChen Electronics Co., Ltd. , https://www.gcneotech.com


